• Skip to primary navigation
  • Skip to content

  • Home
  • Blog
  • About
  • Contact Us
  • Show Search
Hide Search

Uncategorized

How To Play The F Major Scale

By

The F Major Scale is one of the easier scales to play. It is super easy! It has all white notes except for one.

There is one sharp # on this scale making it easy to remember. It is almost identical to the C major scale except it has a B flat in it. The C major scale has all white notes in it, and this scale has all white notes but one.
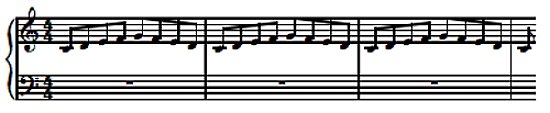
Notes In the Scale

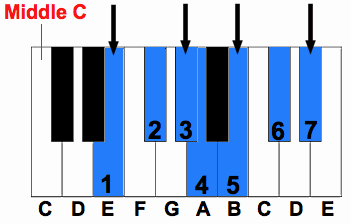
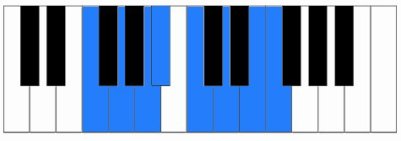
The notes in the Scale are F, G, A, Bb, C, D, E, F.

It is made up of all white keys and with one black key being the Bb.

Start on the root, which is F, and then go up the Whole Steps and Half Steps for a major scale. W, W, H, W, W, W, H.

F Major Scale

Fingering

The fingering for the F Major scale is a little bit different then most other scales have you tuck your thumb under your middle finger as you ascend and cross your middle finger over your thumb when descending.

Right Hand

Right-Hand fingering starts with the thumb on F, the second finger on G, and the third finger on A. Instead of crossing under at this point you are going to use your fourth finger, ring finger, on the Bb. Now you will cross under with your thumb on the C, second on D, third on E, and end with the ring finger on F Going back down the scale start with the fourth finger on F, third on E, second on D, and fist on C. Then you crossover with your ring finger to the Bb and play the rest of the scale with the remaining fingers.

Ascending: 12341234

Descending: 43214321

Left Hand

Start with the fifth finger on F. Walk up the scale until you get to your thumb on C. Then crossover your middle finger over your thumb to land on the D. Then walk up the scale with the remaining fingers.

The F Major Scale starts with the first finger on F. Walk down until you get to the middle finger on D. Then fold under your middle finger with your thumb to land on C. With your thumb on C you can walk down the rest of the scale with the remaining fingers

Ascending: 54321321

Descending: 12312345

This scale is different from other scales in the fingering used to play it. It takes time to learn the switch with the right hand. Take time to practice both hands and to learn the notes on the scale. Being that there is only one sharp here makes it easy to remember what notes you can play.

Go From F Major Scale Back to How To Play Scales
Back to Home Page

Learn Eighth Notes Free Lesson

By

When you divide a note into eight different parts your get eighth notes. To find the value of these notes you have to divide a quarter note in half.

The quarter note receives 1 beat so we need to subdivide it to see how long to hold out the note.

Subdividing Notes

If you remember from the previous lessons there are four beats per measure. If you played a quarter note on each beat you would have four quarter notes in a measure.

Subdivide those four quarter notes give you eighths.

Look at the image below to help you understand how subdividing notes works.

eighth notes subdivided

This tells us that the eighths get half the time of a quarter note. Which means that there are eight of them in one measure

To count this note you count 1 and 2 and 3 and 4 and. Each number and word gets a note.

Look at the image below and you will see that there are plus signs between the numbers. You count these plus signs as “and.”

eighth notes

What They Look Like

It is identical to a quarter note in that it has a filled in circle with a stem. The difference is that these have one flag off the side of the stem.

These notes can be put together in pairs also. They take the flag and connect it to the other note to make two notes together.

You still play these notes as individual notes.

Just because the flags are together you still play these notes as individual notes.

Take a look at the image and see how there are bars at the top of the notes instead of flags. This bar above the note connects these notes together. Instead of giving them a flag like a normal eighth note, these have flags to represent the note.

eighth note warmup

Listen to the audio file and you can hear how the notes that are tied together with bars are still played separately and still counted 1 and 2 and 3 and 4 and.

Click to go to Lessons #14 – Sixteenth Notes
Back To Lesson #12 – Grand Staff
Go From Eighth Notes Back to Lessons
Back to Home Page

The E7 Chord: How To Build and Play E Dominant Seven Chord

By

he E7 chord is an altered version of the E Major Chord. It has the same notes as the E major chord with one additional note.

With the addition of this note, it creates a chord that has a lot of unique sounds and voicings. With the structure of this chord being the same as the original E major chord, it makes playing and building this chord quite simple.

There are multiple fingerings and inversions for this chord making it a little more difficult to play then a major chord. Once you learn the formula and fingering for it you won’t have any trouble.

What is an E7 Chord?

E7 is made up of four notes. Three of the notes are from the E Major Chord. E major consists of the first, third, and fifth notes in the major scale.

These notes are E, G#, and B

Check out my lessons on Major Chords to for easy instructions on how to build major chords.

There is one additional note that is to be added to make the E7. This is what is known as the Dominant Seventh.

This chord is made by playing an major E chord, and adding the dominant 7 note to either the top of the chord or the bottom.

How to Make an E Dominant Seven Chord

Seventh chords can be a little confusing because there are two types of seventh chords. The Major Seventh and the Dominant Seventh.

An E Major Seventh would be written as EM7, while the Dominant Seven would be written as E7.

The difference between these two chords is whether or not the seventh note is altered or left alone.

In the EM7 chord, you play the E major chord, plus the seventh note in the scale. This would give you the notes E, G#, B, and D#. The D# has not been altered at all when making this chord.

e major 7

In an E7 chord you have to alter the seventh note in the scale. Instead of using the D# that is in the E major scale, you have to use what is called the dominant seventh, or minor major seventh.

This means that you find the seventh note in the scale, which in this case would be D#, and make it a minor.

Making a note minor, means to move it one half-step to the left.

Instead of using the D#, you must move it one note to the left, which would be a D natural. So the notes in an E7 chord are E, G#, B, and D.

Take a look at the image to see how the Dominant Seventh is derived.

e7

Quick Tip!
To make an E7 chord, make an E Major chord. Then add a flat 7!

Formula

The formula for this chord is similar to a major chord. We use the same notes as we would for a major chord just add the dominant seventh.

The formula would look like this: I – III – V – bVII

Fingering and inversions

Since there are four notes in the E7 chord, there are four possible inversions. Each inversion has its own unique fingering. This helps make playing the chord easier, and allows easy access to other notes while playing the chord.

e7 chord inversions

Take a look at the image to see the fingering for each of the four inversions.

Root Position

The root position is made up of the first, second, third, and fifth fingers. This is the most common of the four inversions. Play the E with the first finger, G# with the second finger, B with the third finger, and D with the fifth finger.

First Inversion

To play the first inversion, take the E from the bottom of the chord, and move it to the top of the chord. Start with the first finger on G#, second on B, fourth on D, and fifth on E.Second Inversion

The second inversion starts on a B. Use the first finger on B, second finger on D, third finger on E, and fifth finger on G#.Third Inversion

The last, and final inversion, starts on D with the first finger. Play an E with the second finger, G# with the fourth finger, and B with the fifth finger.

If you haven’t already noticed, these inversion are built by taking the lowest note in the previous chord and moving to the top of the chord. Check out this page for more info on piano chord inversions.Sheet Music

Here is a chart showing the four inversions of the E7 chord on sheet music. If you look at each inversion, you will see that there is one sharp in the E Dominant 7 chord.

There are four notes in each of the four inversions with a G sharp in each of them.

e7 chord sheet music

Study this chart and memorize the inversions of the E7 chord so you can easily pick it out in a piece of sheet music.

The E7 chord, also known as the E Dominant chord is an easy and very common chord used in today’s contemporary music. Remember the notesE, G#, B, and D to make this chord.

It’s also important to remember the formula of I – III – V- bVII. This formula can help you find a Dominant Seventh chord on the spot.

Need more help learning chords? Learn almost every chord you’ll ever need with our Piano Chord Encyclopedia.

Go From E7 Chord Back to Piano Chords
Back to Home Page

Common Chord Progressions – Learn to Play By Ear

By

If you want to play piano by ear learning common chord progressions is a must. These progressions are necessary for you to play songs quickly by ear.

I remember when I was first learning to play piano by ear; I always wondered how people could play along with a song even though they never heard it before. I was like they had some kind of instinct that told them what to play.

After years of trying to figure out what it was I finally figured out that all songs have can play 90% of the songs out there.

How To Read a Progression

The common chord progressions on this page are written in the Nashville Number System. This is how professional studio musicians read music. They are given a piece of paper with a bunch of numbers on it. Each number represents a chord that is to be played.

Each number represents a note in the scale. For example, if you are in the key of G, and the progression starts with a 1, then you play a G major chord. If you were in the key of E 1 would be an E major chord.

If the progression says a 4, you would count up the scale until you get to the fourth note in the scale and then you build that three note chord.

A number by itself will always be a major chord. A number with a minus – sign in front of it represents a minor chord. So with the progression 1, 4, 6-, 5 all the chords will be major except for the 6 which will be a minor chord.

Need To Know Progressions

Here is a list of some of the progressions that you are most likely to hear in a song.

1     4     6-     5

1     5     6-     4

1     6     5     4

1     6     4     5

6     4     1     5

1     5     4     5

1     5     4     1

1     5     4


Practicing Progressions

The best way to practice these progressions is listening to your favorite song try to play along. Chances are that some part of the song will follow one of these progressions. Doing this is helpful because it helps you to learn the progressions that go together and it will help you with your ear training also.


Other Common Chord Progressions

There are a lot more chord progressions out there other than these. These are the most common for contemporary music. I would say about 70% of the songs you listen to would have one of these progressions in it somewhere. That’s not to say that a song that you want to play along with doesn’t fit with these.

There are some songs that have weird of different progressions in them. For example some songs will have a 2 minor chord, or a flat 7 chord. The best thing to do is just experiemnet with all the ways that go together. There really is no limit to how many different progressions there can be, but most contemporary songs that are out right will follow the ones listed above.

Need more help learning chords? Learn almost every chord you’ll ever need with our Piano Chord Encyclopedia.

Go From Common Chord Progressions Back to the Chord Piano

The Dotted Half Note

By

A dotted half note is another music note symbol showing the length in which a musician should hold out a particular note. This note is similar to a half note, except the length it is held out is longer.

There are multiple aspects of this note that needs to be addressed. Its comparison to a normal half note, the length in which it should be held out, and how to use it in 4/4 time and 3/4 time.

Let’s take a look at how this note looks and how it compares to to half note.

Here It Is!

dotted half note

The dotted half note looks exactly the same as a half note. The only difference between these two is that the dotted note has a dot next to it. The dot is always going to be on the right side of the note.

This note is a circle or oval with a staff line going either up or down.

 Dot on Dotted Half Note

The dot that corresponds with the note will always sit inside one of the spaces on the staff.

Take a look at the image and see what a this note looks like. You can also see where the dot falls on the sheet music.

Note Length

The dot on any note tells us that you are to add half the value of the note.

We are looking at a half note, which is worth two beats. We then add on half of the value. Half of two is one, so we need to add one beat to the original two beats. This means that the dotted note is worth three beats.

dotted half note explained

Dotted Notes and Time Signature

It’s important to know the time signature you are playing in when using these notes.

The time signature is made up of two numbers, a top number and a bottom number. The top number tells you how many beats there are per measure.

4/4 Time

dotted half note illistration

Look at the image, it tells us that there are four beats in the measure.

The dotted half note will only count for three of those four beats. There needs to be another note to take up the last beat.

In the image, it shows that there is three beats being taken up by the half note. The quarter note then takes up the fourth beat in the measure.

3/4 Time

dotted half note illistration

This time signature is not used as much as 4/4 time, but it is still very common. In 3/4 time, the top number tells us that there are three notes per measure. Instead of four beats, there is now only three.

This changes things for the dotted half note. Above in 4/4 time, the dotted note didn’t take up the entire measure. In 3/4 time, the dotted note now takes up the entire measure.
There is no need for their to be any other notes, rests, or music note symbols.

The dotted note is used in 3/4 time like a whole note would be in 4/4 time.

Onward and Upward

Now that you understand what a dotted half note is and how it is used, its time to start using it in you music. The dot tells us to add half of what the note is worth. This makes this note worth three beats.

The most important thing you can do before you start to play a piece of music is look at the time signature. This is going to tell you how many beats there is going to be in a particular measure. Especially when using dotted half note, you need to be aware of this.

The dotted note will take up the entire measure in 3/4 time. It will only take up part of the measure in 4/4 time. There will need to be another music note symbol in the measure in 4/4 time.

Go From Dotted Half Note Back to Lessons
Back to Home Page

  • « Previous Page
  • Page 1
  • …
  • Page 17
  • Page 18
  • Page 19
  • Page 20
  • Page 21
  • …
  • Page 24
  • Next Page »

©2018 PianoSecrets.com | About | Privacy Policy | Contact Us