• Skip to primary navigation
  • Skip to content

  • Home
  • Blog
  • About
  • Contact Us
  • Show Search
Hide Search

Blog

The Cm Chord On Piano

By

The Cm Chord is a minor chord that derivatives from a C Major Chord.

c minor

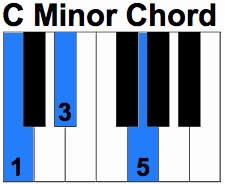
The notes in this chord are C, Eb and G.

This can easily be compared to the C Major Chord in that the notes in a C Major Chord are C, E, and G while the notes in the C Minor Chord are C, Eb, and G.

Notice the difference between the C Minor Chord and C Major Chord is there is an Eb instead of an E.

The three notes in this can be found by using two different approaches. The interval approach and the number approach.

Each of these approaches are useful in finding chords. If you can memorize each approach for a certain chord, you can then apply it to any of the 12 keys. This is helpful when transposing to alternate keys.

Quick Tip!
The notes in the Cm Chord are C, Eb, G

Building a Cm Chord

Number Approach

Using the number approach to find the C Minor Chord is a very simple method. The formula for this chord is using the 1, Flat 3rd and 5.

To locate the notes you will start with the root note of C which is the 1.

Next find the third note in the scale and make it a flat. This is where the Eb note comes from. This is what’s called using a Flat 3rd.

To find the last note in the chord, count up the C Major Scale to the Fifth note and this will be the top note in the chord.

Quick Tip!
The number formula for the Cm Chord is 1-b3-5
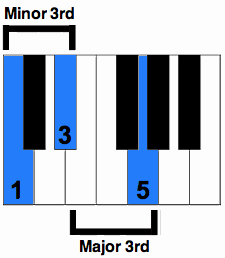
Interval Approach

Using the intervallic approach uses intervals identify the notes in the chord.

To find the notes in the Cm Chord using this approach start with the root note of C. Then add the minor third on top of that which will is Eb. To find the top and final note add the perfect fifth or the G on top.

The formula would then be:

Root – Minor Third – Perfect Fifth

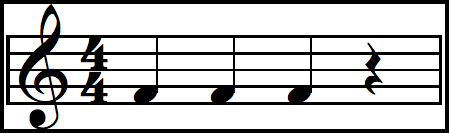
Take a look at the image below and you will see how each interval stacks on top of the other forming the chord.

c minor intervals

This chord is almost identical to C Major Chord with only one small difference. Rather than playing an E natural like in the C major chord you are going to play an Eb giving you C, Eb and G.
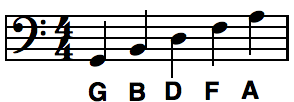
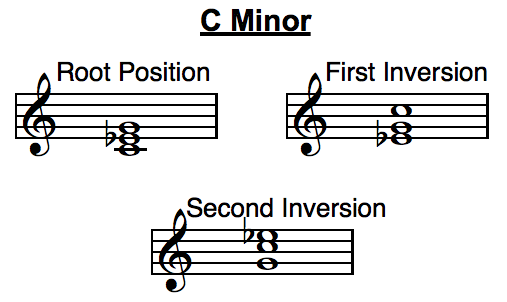
Inversions

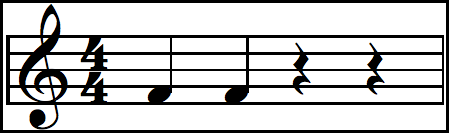
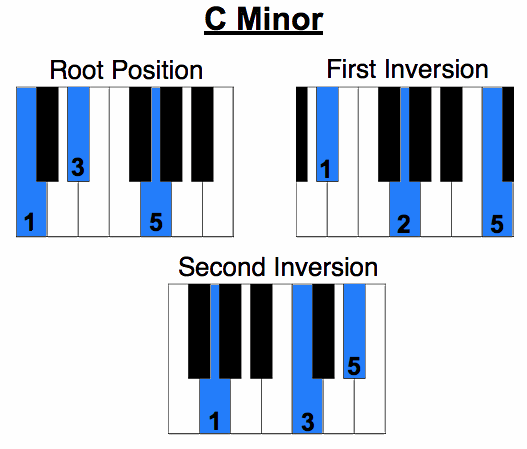
Like all chords, the C minor chord has three notes, making it a triad. Because there are three notes in this chord there will be three different ways that we can play it.

Inversions are simply adjusting the order of the notes creating a different sound for the chord. For example: rather then starting the chord on C you would start it on either the Eb or G.

The first inversion is going to be the root inversion which we have talked abut throughout this page. Starting on the C and playing the rest of the notes in the chord; Eb and G. This is the standard inversion and starts on the root note of the scale.

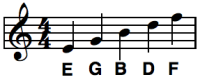
The first inversion is going to be taking the lowest note, the C, and moving it to the top of the chord. This chord will start on Eb and add the G and C on top.

The second inversion of the Cm chord is going to start with the G as the lowest note. Then add C and end with Eb on top.

Use the image below to see how each note is moved from the bottom of the chord to the top of the next inversion.

c minor inversions note

Fingering

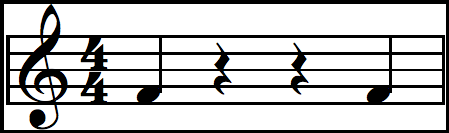
Right Hand Fingering

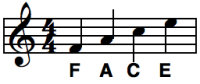
The fingering for the Cm chord is similar to that of a major chord. The right hand fingering for the root inversion is going to start with the first finger or the thumb, on the C, the third finger on E flat and the fifth finger on G.

The first inversion is going to have the first finger on the E flat, the second finger on G and the fifth finger on the top of the chord on the C.

The second inversion is going to start with the first finger on G, the second finger on C and the fifth finger on E flat.

Use the image below as a guide for proper fingering for the Cm Chord.

C minor inversions

Left Hand Fingering

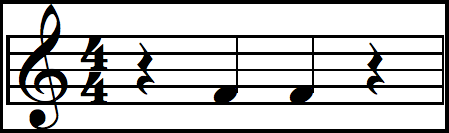
Fingering for the left hand for the root inversion starts with the fifth finger on C, third finger on Eb, and the fifth finger on G.

The fingering for the first inversion of the Cm chord is going to start with the fifth finger on Eb, the third finger on G, and the first finger on C.

The second inversion for the C minor chord is going to start with the small finger or the fifth finger on G, the second finger on C, and the fifth finger on Eb.

Uses of the C Minor Chord

The Cm chord is commonly used in the key of Eb, and is also commonly used in the key of Bb.

In the key of Eb, this chord is commonly used as the minor six chord of the key. You can also start a song with the C minor chord. Generally this chord follows after a Ab Major Chord or a Bb Major Chord.

In the key of Bb, the C minor chord can be used as the minor second chord which can commonly be used in a bridge of a song. It can also be followed by an F Major Chord.

This chord is very easy to learn because it is a derivative of C major chord. The C major chord is generally the first chord that a beginner piano player learns.

In order to play this chord easily is to start by playing a C major chord, and then adjust the chord by moving the third note of E to Eb.

If you need more help learning chords The Piano Chord Encyclopedia is a great resource. It includes Fingering, Inversions, and Music Notation for over 645 different chords. Check it out Here.

Go From Cm Chord Back to Piano Chords
Back to Home Page


Elements of the Piano Staff

By

The piano staff will tell you just about any information about a piece of music that you want. This part of the sheet music will tell you all you need to know about the song you are about to play.

There are many important elements to a piece of sheet music that the musician must know. Let’s jump right in, and take a look at the part of the staff that you must know to learn how to read music.

What is the Musical Staff

The piano staff is full of important information that you must know. It tells you not only the notes you need to play, but other vital information that you have to know to play the song.

Piano Staff

Just look at the image above and see how much there is on the staff, and there isn’t even a note in the picture.

Most beginners just focus on the notes in the staff. They will just start playing, and realize that things aren’t sounding right. You have to study the entire piano staff for all the necessary pieces of information.

The piano staff is also known as the grand staff. It is a combination of both the treble and bass clef.

Let’s begin by discussing all the parts of the staff that aren’t note related.

Elements of the Grand Staff

Measure Number

If you look back at the image you can see that there is a number 1 in the top left corner of the musical staff.

This number tells us that this is the first measure of the song.

Measure Number

A measure is one section of beats in a piece of music. So, this number tells us that this is the first section in the song.

In this image you can see how each of the section are numbered one through 5. This tells us that there are five measures in this segment of music.

Why are measure numbers helpful?

They can easily guide you to a particular part in complex piece of music. Say your music teacher tells you that you need to work on measures 40 through 50. You can easily turn to that part of the music without having to count each of the measures.

Bar Line

A bar line is a vertical line that separates each of the measures in a piece of music.

In the common four-four time signature, each measure has four beats. In order to separate each set of four, we use a bar line. The bar line a visual that helps us section off each measure into its equal set of four beats.

In other styles of music there are only three beats per measure, this is called three-four time. Since there is only three beats per measure here, each bar line will separate groups of three instead of groups of four.

Brace

Music Brace

The brace on the piano staff is very important. This tells us that the two clefs, bass and treble, are to be played together by the same instrument.

The brace is important because if you ever experience choral music, or a piece of sheet music that contains multiple instruments on it, it can be confusing to know which is the piano part and which is for the other instrument.

The brace will indicate which clefs are used for the piano. It connects each of the clefs, telling the musician that these clefs go together.

Treble Clef and Bass Clef

Treble and Bass Clef

The Treble Clef and Bass Clef represent the notes on the grand staff. It also tell us which hand to play a particular note with.

The right hand will play the notes in the treble clef, and the left hand will play the notes in the bass clef.

The word treble means higher in pitch, and bass means lower in pitch. So, the treble clef notes are going to be high in pitch, while the bass clef notes are going to be lower in pitch.

As the notes go down in the bass clef they get lower in pitch, and as they go up the treble clef they get higher.

The two clefs are also called the G Clef and F Clef. If you look at the image, you can see that the treble clef can be called the G clef, and the bass clef called the F clef.

G Clef
F Clef

This naming comes from which note goes through the clef.

A G line runs through the center of the bottom curl.

An F line runs between the two dots.

This is how you determine the name of the clef. The clef can be moved to a different line, which will change the name. This happens mostly in orchestra instruments.

Click here if you need more instruction with the treble clef or bass clef.

Key Signature

Key Signature

The Key Signature is one of the most important parts of the piano staff. Before you ever start to play a song you need to know the key that the song is in.

The key signature tells you which notes will be sharp or flat.

If you look at the image you can see that there is one sharp in the treble clef and one sharp in the bass clef. They are both on an F note. This tells us that throughout this song, whenever we come to an F, we need to make it an F sharp instead.

This tells us that this song is in the key of G, because G has only one sharp.

There can be anywhere from no sharps or flats, up to seven. Take a looks at this key signature chart for every key signature.

Time Signature

Time Signature

The time signature tells us the number of beats per measure the song has. Like we talked about before, each measure has a particular of beats that we need to know so we can correctly play the song.

The piano staff to the right shows the common four-four time signature.

The number on the top tells us the number of beats per measure. So in four-four, there are four beats per measure. In three-four time, the three is on the top, telling us there are three beats per measure.

The number on the bottom tells us which note get one beat. In the example of four-four, the quarter note gets one beat, because the four represents the quarter note.

If we were in the time signature of six-eight, the eighth note would get one beat because the eight is on the bottom.

Double Bar Line

The double bar line is an indication of where the piece of music ends. It looks similar to a normal measure bar line, except it is a little thicker at the end. Watch for this double bar at the end of a piece of music.

Double bar Line

As you can see there’s a whole lot more to the piano staff then just the notes. There is a lot of information that is crucial to the song you are playing.

Make sure that each time you play a piece of sheet music that you take time to study all the elements of the musical staff before you start to play.

If you want more information on this, and other piano related topics Click Here!

Go From The Piano Staff Back to Piano Theory
Back to Home Page

The Quarter Rest – All About The Silence

By

Playing piano isn’t only about the music, it’s also about silence. A quarter rest is used to add silence into a piece of music.

When reading sheet music, the composition will contain rests. A rest tells you to stop playing any notes. You are to take a “rest” from playing.

When reading music you will see rests all throughout the music. It is important that you know the difference between a rest and a note and how to apply them in your music.

Let’s take a look at what this rest is, and how to use it.

What’s It Look Like?

This rest sits in the middle of the staff, between the top and bottom staff lines.

Take a look at the picture to see what the rest looks like.

Some teachers say it looks like fish lips. I personally think it looks like a person looking to the left. Whatever you want to use to help you remember it, by all means use it.

quarter rest

When this rest is used in music, it will take up one quarter of the measure that it is in.

In the image below we have quarter notes and rests together in the same measure.

If you divide the measure below into four equal parts, you can see how the each of the notes, and rests, take up about one fourth of the measure. This is an easy visual way to tell how long to hold a quarter rest.

quarter rest1

How Long To Hold It Out?

four beats per measure

To understand how a rest works, we need to understand time signature.

Time signature is a musical symbol that sits at the beginning of a piece of music. Look back at the image above. See the numbers right next to the treble clef? The 4/4 tells us the time signature of this segment of music.

The top number is what we need to focus on right now.

We see that the top number is a 4. This tells us that there are going to be four beats in each measure.

The time signature of four four would count:

1…..2…..3…..4…..

Listen to the audio…… This tells us how to count measures in 4/4.

Now On To The Important Stuff!

Not that the other wasn’t important, this is what you really need to know when reading rests and music note symbols.

To know what a quarter rest is, think of it like a dollar. The dollar is like one measure of music. There are four quarters in a dollar, so there are four separate beats in a measure.

Each one of the rests, or quarter notes, is like one of the quarters that are in a dollar.

Each rest tells us to stop playing. Total Silence!

Whenever you see this rest, it means to stop playing.

Quick Tip!!

A rest doesn’t mean to let the note before it continue to ring out. When you see a rest, you need to take you hand totally away from the keyboard and stop playing.

Comparing Rests To Quarter Notes

A rest is similar to a note, in that they have a particular value in which you need to hold them out. But like we said before, a quarter note is holding out a note or tone, and a rest is holding out silence.

You can compare a quarter rest to a quarter note because they are held for the same value, a quarter of the measure.

If there are four quarter notes to a measure, then there are going to be four rests to a measure. Take a look at the image below and you can see how quarter notes and rest compare to each other.

quarter note comparison

Each quarter note is identical in length as the rest. There is one beat for the note, and one beat for the rest. The note is played, while rest is silent!

Now let’s go ahead and do some practice counting using quarter rests.

Practice Counting

Here we have four example of counting with quarter rests. When you count rests, you count the notes with the beat that it receives (1, 2, 3, or 4) an then say “Off” for the rest.

Go ahead……

Here is the first example.

               1        2      3     Off

demo4

                  1      2    Off   Off

demo3

                 1    Off    Off     4

demo1

               Off     2       3    Off

demo2

The quarter rest is a musical note symbol that represents silence in a piece of music. Like the quarter note, the rest is equal to one beat in the measure. If there are four beats in the measure, then the quarter rest gets one beat. Make sure that when you count music rests you say “Off” to give you a cue to stop playing.

Try saying it out loud. Speaking it will help you plant it into memory when it comes time to play. This will really help you to remember to Stop playing.

Go From Quarter Rest Back to Piano Lessons
Back to Home Page

Read Piano Notes

By

You sit down at the piano to try and read piano notes. You stare at the mass of confusion on the paper with a confused look on your face.

You have no idea how you are going to start reading piano music.

The notes on the piano are not all that hard to learn. There is a bit of difficulty, but once you learn the basics it’s just a matter of time until you are able to learn piano notes.

On this page I am going to give you the inside scoop on how to read piano notes. A lot of people make reading piano notes a lot harder than it needs to be. I am going to break it down to the basics so that you will be reading piano notes in not time.

Now on with the show!

The Basics of How to Read Piano Notes

The first thing you need to know when reading piano music is clefs. There are two clefs on piano music, the top clef and the bottom clef.

The top clef is known as the treble clef and the bottom clef is known as the bass clef. The treble clef contains the higher pitched notes, while the bass clef holds the lower pitch notes.

clefs

The notes in each clef sit on lines known as the staff. Each staff contains a series of horizontal lines that run the length of the sheet music. These lines are what tell the musician the note on the piano they are to play.

Between two lines is a space. These spaces also represent notes on the piano. The lines and spaces on the sheet music are what guide the musician on what to play.

lines and spaces

Take a look at the images above and you will see the lines and spaces on the piano staff.

The lines and spaces are highlighted in blue.

Notes One The Page

The notes on piano sheet music are named with letters. This is called the “musical alphabet.” The musical alphabet is a little different than the standard alphabet that you and I know. It follows the same order but it stops on the letter G.

This means that there are only seven notes in the musical alphabet, notes A through G. No H, I J, or K.

The musical alphabet looks like this: A, B, C, D, E, F, G.

Once you get to G, you start back over at A. This is important to know when reading the grand staff, or both together.

musical alphabet

Treble Clef Notes

To read piano notes you have to learn the notes on both clefs. Take a look at the treble clef and let’s start reading piano music.

Lines

The lines of the treble clef start with E on the bottom line. As you move up the staff the notes read as follows: E, G, B, D, F.

Most private teachers will use a sentence to help students remember the notes on the lines of the treble clef. Use the sentence Every Good Boy Does Fine to help remember the notes on the lines of the treble clef.

treble clef lines

Spaces

A space on the staff is the area between each line. The bottom space on the treble clef is F, the second space is A, third space is C, and the top space is E.

So the notes on the treble clef spaces are F, A, C, E. Think of the word FACE when referring to the notes on the spaces in the treble clef. This is an easy way to remember the notes on the spaces.

treble clef spaces

Bass Clef Notes

The bass clef notes are read like the notes on the treble clef. The staff is divided into lines and spaces like above. Let’s look at the notes on the bass clef and find an easy way to read piano notes on the bass clef.

Lines

The note on the bottom line of the bass clef is G. As you move up the lines on the bass clef they would read G, B, D, F, A.

An easy to remember sentence to go along with these notes would be Good Boys Do Fine Always. Use this sentence when reading piano music in the bass clef.

bass clef lines

Spaces

The notes on the spaces of the bass clef are A, C, E, G. Use the sentence All Cows Eat Grass as a way to easily remember the spaces of the bass clef.

bass clef spaces

Grand Staff

Now that you know the notes on the both clefs, it’s important to know how to read notes on Grand Staff. Above we looked at each clef separately; now let’s combine both clefs to create the Grand Staff.

If you look at the notes on the grand staff you will notice that there is gap between the top line of the bass clef and the bottom line of the treble clef. The top note of the bass clef is A, and bottom note of the treble clef is E.

grand staff A-E

On the grand staff you are missing three notes in the musical alphabet. It skips from A to E omitting B, C, and D.

Where did these notes go?

The large area between the clefs is where these three notes belong. We use what’s called ledger lines to represent the notes in this area. Take a look at the image below and you will see how there is a short line representing C between the two clefs. This C is known as Middle C.

middle C

You can start at middle C and go through the musical alphabet either up or down counting lines and spaces to read the notes on the staff.

When we read piano notes you must learn the notes on both clefs, you should also know how to apply this to the grand staff. Reading piano music on the clefs can be easy, but applying it to the grand staff can be a little more difficult.

Remember the sentences that were used to help you with the lines and spaces on each clef. Also, practice reading the notes on the piano on the grand staff so you can read both the right hand notes and the left hand notes together.

Go From Read Piano Notes Back to Lessons
Back to Home Page

Semitone and Half Steps

By

A semitone, which can also be called a half step, is a term used to describe the smallest interval in music.

An interval describes the distance between two notes. Or in other words, how far one note is from another.

Moving from note to note is how we create melodies, build chords, and play by ear. Intervals allow the musician to make a judgment about how far one note is from another.

If you ever sat at the piano and tried to pluck out the melody of a song, you are attempting to guess what interval you must move to get the next note. This can be a tough thing to do at first, but you will find yourself getting better and better the more you practice.

So let’s get back to what a semitone is.

This interval can also be referred to as a half step or half tone. This is because the you are moving half the amount of a whole step.

A whole step tells you to move up or down the piano keyboard two notes. If you started on C and moved up the keyboard a whole step you would end on D.

From C to Db is one note, then from Db to D is another note.

This example tells us how to move for a whole step, so let’s try making this a semitone or half step.

Earlier I said that a half step is one-half of a whole step. So if a whole step tells you to move two notes to the right or left, then a half step tells you to move one note to the right or left.

If you play any note on the piano, you move to the note that is directly to the left or to the right of that note. This gives you a half tone.

Here’s a test for you:

If you play a C, the next note is a D, right?

Nope.

Half steps take into consideration both black and white notes. This means that if you are playing a C, then the note directly to the right of it would be a C#. (The Black note to the right of the C)

half step up


This movement from the C to the C# would be moving a half step up.

What if you move a half step down from C?

It would end on a B note.

half step down


Just move to the note directly to the left and you have just moved a half step.

Using Semitones

The real question is why do you need to know this?

It’s important to know half steps and whole steps because it is the basis of building scales and chords.

In our lesson on scales you will see how important it is to know what a half step and a whole step is.

Knowing what a semitone is might seem unimportant right now. But in order to learn scales (which is one of the most important parts of learning piano) you need to know what a half step is.

Once you master half steps and whole steps you can then transition that into scales which then leads to building chords. Once you can build chords you will be further than 90% of the other piano players in the worlds.

If you want more help learning half steps and whole steps, along with instruction on how to build chords, check out my video course Mastering Basic Piano Chords.

This course shows you how to build every chord you are going to need to start playing your favorite songs in no time.

Click to go to Lessons #6 -Whole Steps
Back To Lesson #4 – Piano Fingering
Go From Semitone Back to Lessons
Back to Home Page

  • « Previous Page
  • Page 1
  • …
  • Page 6
  • Page 7
  • Page 8
  • Page 9
  • Page 10
  • …
  • Page 24
  • Next Page »

©2018 PianoSecrets.com | About | Privacy Policy | Contact Us